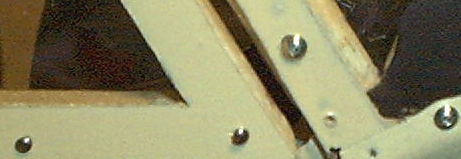
Believe it or not, a Cub has a couple panel lines. They can be found on the cowl and the boot up front. Most cowls on a Cub is made from 4 sections of metal. The cowl splits into two sections, top and bottom, and each is made of 2 sections of metal. Where the sections come together, they form a panel line and require a few rivets.
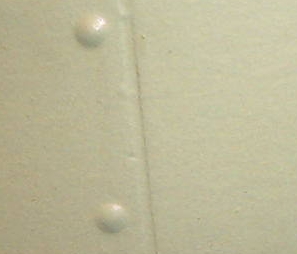
Panel Line For the cowl I laid down a couple strips of 1/32 chart tape (purchased from local Blueprint Company) on top of each other where I wanted a panel line. Next mix up a small batch of finish epoxy with microballons and apply it to the line. With a small piece of balsa squeeze the area and discarding any extra epoxy. Work as two swipes one on each side of the tap, not as one swipe. After epoxy has cured, sand lightly to feather the epoxy. Next remove the tape and sand lightly. You have now created the panel seam.
Rolled edge On the backside of the metal boot on a Cub they use a rolled edge. This just folds the metal back on to itself to eliminate a sharp edge. I have simulated this with some half round styrene (Evergreen brand). The half round is very flexible so it can go around curves and compound shapes. Painted and applied with instant CA.
Rivet #1 There is about a blue million ways to create rivets. The way I have come about making them is to get some good old RC56 canopy glue. Put a small puddle out on paper, taking a toothpick slightly dull the end. Dip that end into the glue and start dropping rivets in place. I have been able to drop 4 or 5 rivets before going back to pick up more glue. When the glue starts to set, you can push on the rivets giving it a flatter appearance.
Rivet #2 I have also used flat head straight pins for rivets. Just cut the pin short, dip the pin end into ca and insert into place. This will give you a nice silver head on the rivets.
Rivet #3 Micro Fasteners sells Button Head socket drive sheet metal screws. They are #0 X 3/16 (Micro Fasteners # stp0003) and require a .035 hex key. They come in silver and black. I have used them to attach the windows and windshield on my 1/4 scale cub.
Screw #1 Most of the time I try to use true screws where need. Ace hardware has 0-80 stuff and Micro fasteners is also a good source for small screws.
Screw #2 Follow the instructions above for Rivet #1. When the glue dries to a rubbery feel, press a small screwdriver into it and rock it around. This will leave the impression in the glue. I have tried this several times. If you don’t catch the glue at the proper time, it will not work.